Wondering how to apply UV DTF stickers without a heat press, special machine, or any guesswork? You are in the right place. UV DTF transfers are some of the easiest decals to use because they stick to hard surfaces with simple hand pressure, making them perfect for crafters, small businesses, and anyone decorating tumblers, mugs, and more. Unlike traditional heat transfer vinyl that demands an iron or press, learning how to apply UV DTF stickers is a peel-and-stick skill almost anyone can master in a single afternoon. By the time you finish this guide, you will understand the full process from start to finish, including the small details that separate a flawless decal from one that bubbles or lifts.
Why UV DTF Is So Beginner-Friendly
UV DTF stands for ultraviolet direct-to-film, and the magic is in how the design is cured. The ink and adhesive are hardened with UV light during manufacturing, which means the sticker arrives at your door ready to use. There is no waiting for ink to dry, no weeding tiny letters, and no risk of scorching your project with too much heat. The adhesive is pressure-activated, so the energy you would normally spend on a heat press is replaced with a few seconds of firm rubbing. This low barrier to entry is exactly why UV DTF has become a favorite for first-time crafters and seasoned shop owners alike.
What You Need to Apply UV DTF
One of the best parts about learning how to apply UV DTF is that the supply list is short. Unlike heat transfer vinyl or standard DTF apparel transfers, UV DTF stickers require zero heat. Everything you need is likely already in your craft space.
- Your UV DTF transfer (it comes in three layers: a backing sheet, the printed decal, and a clear transfer film on top)
- A clean, dry, hard surface to decorate
- Rubbing alcohol and a lint-free cloth or paper towel
- A squeegee, credit card, or even your fingernail for burnishing
- Optional scissors if you are trimming individual decals from a sheet
Step-by-Step: How to Apply UV DTF Stickers
Follow these steps in order and you will get a smooth, bubble-free result every time. The whole process takes just a couple of minutes per decal once you get the hang of it.
1. Clean and Prep the Surface
Wipe your item down with rubbing alcohol and let it dry completely. This removes oils, dust, and residue that can keep the adhesive from bonding. Skipping this step is the number one reason decals peel, so do not rush it. If you have been handling the item with bare hands, the natural oils on your fingertips are enough to weaken a bond, so always do this cleaning pass even on a brand-new product straight out of the box.
2. Position the Decal
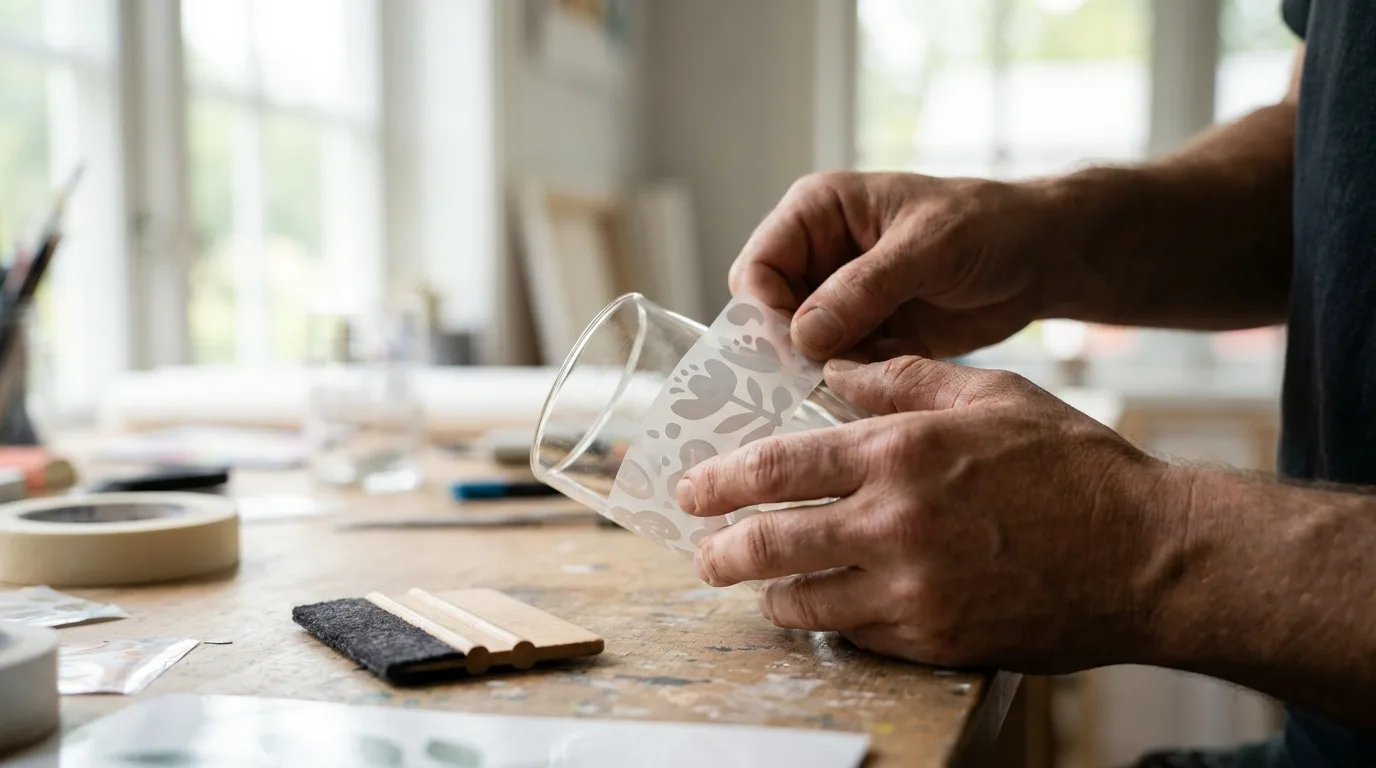
Peel the decal and its clear top film away from the bottom backing sheet. The design will stay attached to the clear film. Carefully line it up where you want it before any part touches the surface, because UV DTF adhesive grabs quickly. A helpful trick is to anchor one edge first, almost like a hinge, then lower the rest of the decal into place so you stay in control of the alignment.
3. Press and Burnish
Lay the decal down and press firmly from the center outward, pushing out any air bubbles. Run your squeegee or card over the entire design several times with strong, even pressure. Good contact here is what makes the transfer permanent. Pay special attention to corners, thin lines, and small text, since these areas need the most encouragement to bond.
4. Peel the Transfer Film
Slowly peel the clear top film back at a low angle. If part of the design lifts with the film, lay it back down and burnish that spot again. Once the film is off, your decal is applied and ready to use.
Tips for a Flawless Finish
A few small habits separate a professional-looking decal from a sloppy one. Keep these in mind as you build your skills.
- Work in a dust-free area so debris does not get trapped under the film
- Apply to curved surfaces in sections, burnishing as you go around the curve
- Use slow, deliberate movements when peeling to avoid stretching the design
- For large or detailed graphics, a hard-edged squeegee gives you the cleanest result
- Warm the room slightly if you are working in a cold space, since adhesives bond a little faster at room temperature
If you want a head start, browse our ready-to-ship UV DTF transfers by size, which come pre-cured and ready to peel and stick.
Common Mistakes to Avoid
Even though the process is simple, a few errors come up again and again. Avoiding them will save you wasted decals and frustration.
Do not apply over a wet or freshly cleaned surface, since trapped moisture weakens the bond. Do not skimp on burnishing pressure, because light pressure leaves the adhesive without full contact. And do not peel the film too fast, especially with fine lines and small text. Another frequent slip is applying to a surface that is too cold straight from a car or garage, which can make the adhesive sluggish. For unique three-dimensional looks, explore our UV DTF 3D gang sheets once you have mastered the basics.
How UV DTF Compares to Other Decal Methods
It helps to know where UV DTF fits among your options. Standard heat-applied DTF transfers are made for fabric and require a heat press, so they are the right call for shirts and hoodies but the wrong call for a glass tumbler. Adhesive vinyl can work on hard surfaces too, but it often involves weeding, transfer tape, and a cutting machine. UV DTF skips all of that with full-color printing baked right in, no weeding, and no machine. For decorating hard goods, that combination of vivid color and effortless application is tough to beat, which is why so many shops keep both heat DTF and UV DTF on hand for different jobs.
Caring for Your UV DTF Stickers
After applying, give the decal about 24 hours before heavy handling or washing to let the adhesive fully set. UV DTF decals are water-resistant and durable, but hand washing is gentler than the dishwasher for items like tumblers. Avoid abrasive scrubbing pads directly on the design to keep colors sharp for years. Storing your finished items away from prolonged direct sunlight also helps the colors stay vibrant, although the UV-cured inks are far more fade-resistant than ordinary printed stickers.
Frequently Asked Questions
Do I need a heat press to apply UV DTF?
No. UV DTF stickers use a pressure-activated adhesive, so no heat press, iron, or machine is required. You simply peel, press, and burnish by hand.
What surfaces work best for UV DTF stickers?
Hard, smooth, non-porous surfaces work best, including glass, ceramic, stainless steel, acrylic, and metal. They are not designed for fabric like t-shirts.
How long do UV DTF decals last?
When applied to a properly cleaned surface and given 24 hours to cure, UV DTF decals can last for years with normal use. Hand washing helps preserve the finish.
Can I reposition a UV DTF sticker after applying?
No, the adhesive grabs immediately and is meant to be permanent. Always line up your placement before the decal touches the surface.
Why is my UV DTF sticker bubbling?
Bubbles usually mean air was trapped during application or the surface was not fully clean and dry. Burnish firmly from the center outward and make sure your alcohol prep has dried completely before you press the decal down.
Can I cut a UV DTF sheet into smaller decals?
Yes. You can trim individual designs from a sheet with scissors before peeling. Cut around the design while it is still on the backing, then peel and apply each piece as usual.
Ready to start sticking? Shop premium UV DTF transfers and gang sheets at Mr Beat Print Studio and bring your custom designs to life with no heat needed.